
From Complexity to Control: Using Teleport for Simplified Kubernetes Access Management

Securely managing access to modern infrastructure is a paramount concern, whether it's on-premises servers, cloud instances, Kubernetes clusters, databases, or other critical resources. The challenge lies in striking a balance between providing seamless access and maintaining airtight security, all while ensuring compliance with regulatory requirements. This is where Teleport steps in, offering a robust solution to streamline infrastructure access and management while prioritizing security, auditability, and compliance.
Kubernetes access management, also known as Role-Based Access Control (RBAC), is a method of controlling who can access the Kubernetes API and what actions they can perform across the cluster. It is a critical part of the overall Kubernetes security strategy. Here is a detailed demonstration of Kubernetes access management:
Users and Service Accounts:
Users: Kubernetes does not manage user identities directly. Instead, it relies on external identity management systems. Users are authenticated and then bound to roles or cluster roles through RoleBindings or ClusterRoleBindings.
Service Accounts: These are used to authenticate pods and services within the cluster. Each pod is associated with a service account, and the service account's credentials are used to authenticate the pod's requests to the Kubernetes API.
Roles and ClusterRoles:
Roles: Define a set of permissions within a namespace. They specify what actions can be performed on resources within that namespace.
ClusterRoles: Similar to roles but apply to cluster-wide resources and are not limited to a specific namespace.
RoleBindings and ClusterRoleBindings:
RoleBindings: Bind a role to a user or service account within a namespace, granting the specified permissions.
ClusterRoleBindings: Bind a cluster role to a user or service account, granting cluster-wide permissions.
Challenge
Managing access to a Kubernetes cluster can be a complex and challenging task. It requires balancing security, scalability, and usability while ensuring compliance with regulatory requirements. As the number of users and clusters grows, managing access can become increasingly difficult, making it essential to have a robust access management system in place.
Here are some of the challenges that organizations may face when giving access to a Kubernetes cluster:
-
Securing Kubernetes clusters presents significant challenges. Exposing the cluster to unauthorized access increases the risk of security breaches, data theft, and unauthorized modifications.
-
The complexity of Kubernetes environments makes managing access and ensuring appropriate permissions difficult, especially as the number of users and clusters grows. Multi-tenant setups amplify these challenges, requiring robust isolation of resources. Managing keys, certificates, and credentials adds overhead and potential error points.
-
Auditing, compliance, and providing temporary access to external parties further complicate the security landscape. Implementing least privilege access and effective monitoring and logging are essential but require careful planning and execution.
Solution
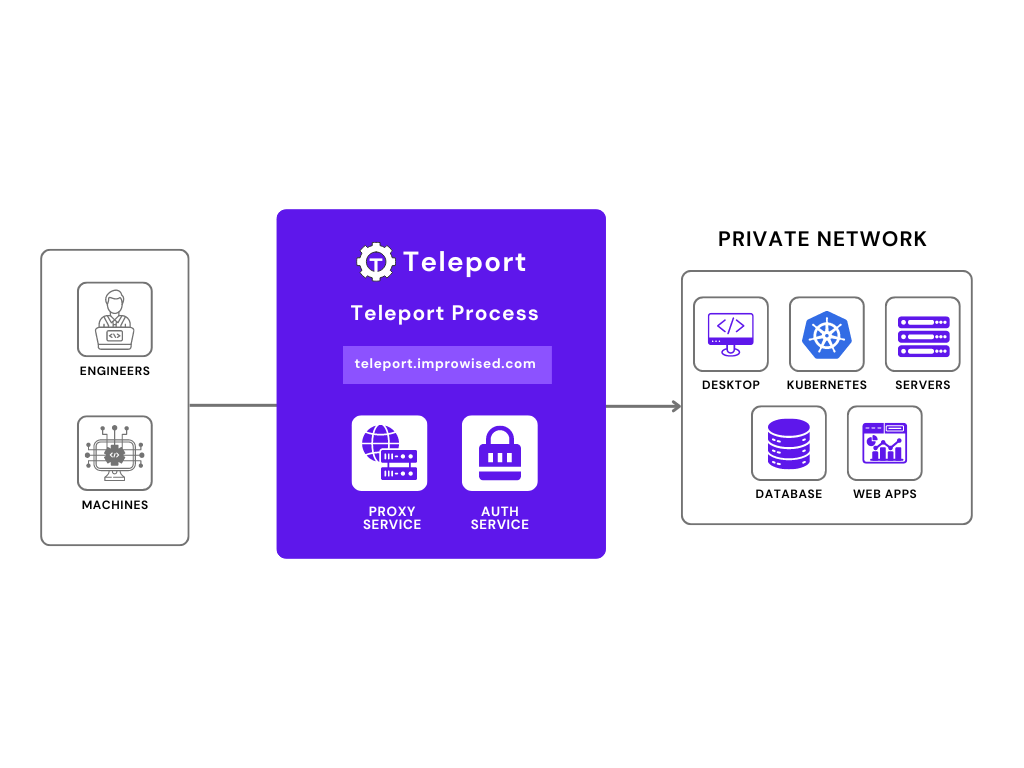
Teleport is a robust and versatile tool that serves as a secure gateway to access SSH and Windows servers, Kubernetes clusters, databases, and web applications with unparalleled ease and reliability. It not only facilitates secure connectivity across diverse infrastructure components but also enhances operational efficiency by centralizing access management and enforcing stringent security policies.
Whether managing containerized applications in Kubernetes environments or ensuring controlled access to critical databases and web services, Teleport offers comprehensive solutions tailored to meet the complex security and compliance needs of modern enterprises.
Teleport provides a more efficient and secure way to manage access to Kubernetes clusters. It offers granular control over user permissions, audit logs, and session recordings. This allows us to streamline administration, reduce the attack surface, and ensure compliance with regulatory requirements.
Deployment Guide
Step 1: Add the Teleport Helm Repository
https://github.com/gravitational/teleport/tree/master/examples/chart/teleport-cluster
Open a terminal and run the following command to add the Teleport Helm repository
helm repo add teleport https://charts.releases.teleport.devStep 2: Update the Helm Repository
Run the following command to update the Helm repository:
helm repo updateStep 3: Install Teleport with following teleport-cluster-values.yaml
apiVersion: helm.toolkit.fluxcd.io/v2beta1
kind: HelmRelease
metadata:
  name: teleport
  namespace: teleport
spec:
  chart:
    spec:
      chart: teleport-cluster
      reconcileStrategy: ChartVersion
      version: 16.2.0
      sourceRef:
        kind: HelmRepository
        name: teleport-helm-source
        namespace: flux-system
  interval: 10m0s
  values:
    clusterName: teleport.improwised.com
    proxyListenerMode: multiplex
    persistence:
      volumeSize: 3Gi
    proxy:
      service:
        type: ClusterIP
      annotations:
        ingress:
          nginx.ingress.kubernetes.io/backend-protocol: 'HTTPS'
          cert-manager.io/cluster-issuer: letsencrypt-prod
      highAvailability:
        replicaCount: 1
    ingress:
      enabled: true
      suppressAutomaticWildcards: true
      spec:
        ingressClassName: nginx
    authentication:
      secondFactor: "off"
    kubeClusterName: "cluster-name"
    highAvailability:
      replicaCount: 1
      certManager:
        enabled: true
        issuerName: "letsencrypt-prod"
        issuerKind: ClusterIssuer
Run the following command to install Teleport to your Kubernetes cluster:
helm install teleport-cluster teleport/teleport-cluster \
  --create-namespace \
  --version 16.0.3 \
  --values teleport-cluster-values.yaml
Creating role based access using teleport roles:
After adding the cluster into teleport One can find the the guide to add the user and their access roles from teleport itself
kind: role
version: v7
metadata:
  name: alice
spec:
  allow:
    logins: ['admin']
    kubernetes_groups: ['edit']
    node_labels:
      '*': '*'
    kubernetes_labels:
      '*': '*'
    kubernetes_resources:
      - kind: '*'
        namespace: '*'
        name: '*'
        verbs: ['*']
---
kind: role
version: v7
metadata:
  name: bob
spec:
  allow:
    logins: ['ubuntu']
    kubernetes_groups: ['view']
    node_labels:
      '*': '*'
    kubernetes_labels:
      '*': '*'
    kubernetes_resources:
      - kind: '*'
        namespace: '*'
        name: '*'
        verbs: ['*']
Use Teleport for Kubernetes access management
1. Deploy Teleport
Step 1: Add the Teleport Helm Repository
https://github.com/gravitational/teleport/tree/master/examples/chart/teleport-cluster
Open a terminal and run the following command to add the Teleport Helm repository
helm repo add teleport https://charts.releases.teleport.devStep 2: Update the Helm Repository
Run the following command to update the Helm repository:
helm repo updateStep 3: Install Teleport with following teleport-cluster-values.yaml
Run the following command to install Teleport to your Kubernetes cluster:
helm install teleport-cluster teleport/teleport-cluster \
  --create-namespace \
  --version 16.2.0 \
  --values teleport-cluster-values.yaml
apiVersion: helm.toolkit.fluxcd.io/v2beta1
kind: HelmRelease
metadata:
name: teleport
namespace: teleport
spec:
chart:
spec:
chart: teleport-cluster
reconcileStrategy: ChartVersion
version: 16.2.0
sourceRef:
kind: HelmRepository
name: teleport-helm-source
namespace: flux-system
interval: 10m0s
values:
clusterName: teleport.improwised.com
proxyListenerMode: multiplex
persistence:
volumeSize: 3Gi
proxy:
service:
type: ClusterIP
annotations:
ingress:
nginx.ingress.kubernetes.io/backend-protocol: 'HTTPS'
cert-manager.io/cluster-issuer: letsencrypt-prod
highAvailability:
replicaCount: 1
ingress:
enabled: true
suppressAutomaticWildcards: true
spec:
ingressClassName: nginx
authentication:
secondFactor: "off"
kubeClusterName: "cluster-name"
highAvailability:
replicaCount: 1
certManager:
enabled: true
issuerName: "letsencrypt-prod"
issuerKind: ClusterIssuer2. Register Kubernetes Clusters
Once the Teleport cluster is deployed, you can register your Kubernetes clusters with Teleport. One needs to configure the teleport-kube-agent in the cluster which you want to add in the teleport.
Manually Register a Kubernetes Cluster
Deploy the Teleport Kubernetes Service:
Adding your first Kubernetes cluster to Teleport
Here you have to add The address of your Teleport proxy server in proxyAddr and the token of the teleport cluster in the authToken.
Add the Teleport Helm Repository:
helm repo add teleport https://charts.releases.teleport.dev
helm repo update
helm install ${RELEASE_NAME} teleport/teleport-kube-agent \
--create-namespace \
--namespace ${NAMESPACE} \
--set roles="kube" \
--set proxyAddr=${PROXY_ENDPOINT} \
--set authToken=${JOIN_TOKEN} \
--set kubeClusterName=${KUBERNETES_CLUSTER_NAME}Verify the Teleport Pod:
kubectl -n teleport-agent get pods3. Configure Access Controls
Step 1: Configure Kubernetes ClusterRole and ClusterRoleBindingTo manage access to your Kubernetes clusters using RBAC, you'll create a ClusterRole and a ClusterRoleBinding.
Create a ClusterRole
apiVersion: rbac.authorization.k8s.io/v1
kind: ClusterRole
metadata:
  name: app-pod-viewer
rules:
- apiGroups: [""]
  resources: ["pods", "pods/log"]
  verbs: ["get", "watch", "list"]
Create a file named clusterrole.yaml with the following configuration to define permissions for viewing pods and logs:
Create a ClusterRoleBinding
Create a file named clusterrolebinding.yaml to bind the ClusterRole to a specific group:
apiVersion: rbac.authorization.k8s.io/v1
kind: ClusterRoleBinding
metadata:
  name: app-pod-viewer
subjects:
- kind: Group
  name: app-developers
  apiGroup: rbac.authorization.k8s.io
roleRef:
  kind: ClusterRole
  name: app-pod-viewer
  apiGroup: rbac.authorization.k8s.io
Apply the Configurations
Apply the ClusterRole and ClusterRoleBinding using the following commands:
kubectl apply -f clusterrole.yaml
kubectl apply -f clusterrolebinding.yaml Teleport can be used to manage Kubernetes access with additional controls. Follow these steps:
Create a Role in Teleport
Go to the Teleport UI, navigate to Roles, and add a new role with the following YAML configuration:
kind: role
metadata:
  name: app-pod-viewer
spec:
  allow:
    kubernetes_groups:
    - app-developers
    kubernetes_labels:
      '*': '*'
    kubernetes_resources:
    - kind: pod
      name: '*'
      namespace: app
    kubernetes_users:
    - app-pod-viewer
  deny: {}
  options:
    cert_format: standard
    create_db_user: false
    create_desktop_user: false
    desktop_clipboard: true
    desktop_directory_sharing: true
    enhanced_recording:
    - command
    - network
    forward_agent: false
    idp:
      saml:
        enabled: true
    max_session_ttl: 30h0m0s
    pin_source_ip: false
    port_forwarding: true
    record_session:
      default: best_effort
      desktop: true
    ssh_file_copy: true
version: v7Authenticate to your Kubernetes cluster via Teleport and test your access controls.
Create a User in Teleport
-
Go to Users in the Teleport UI and create a new user.
-
A link will be provided to set the user's password.
Log in via CLI
Use the following commands in the CLI to authenticate and access the Kubernetes cluster:
tsh logout
tsh login --proxy= --user=app
tsh kube login  --as app-pod-viewer
Access Pods and Logs
After logging in, you can run the following commands to interact with the Kubernetes resources:
tsh kubectl get pods -n app
tsh kubectl logs pods/app-ui-svc-xyz -n app
Auditor and Monitor
Use Teleport's auditing capabilities to monitor and record kubectl sessions.
View Audit Log
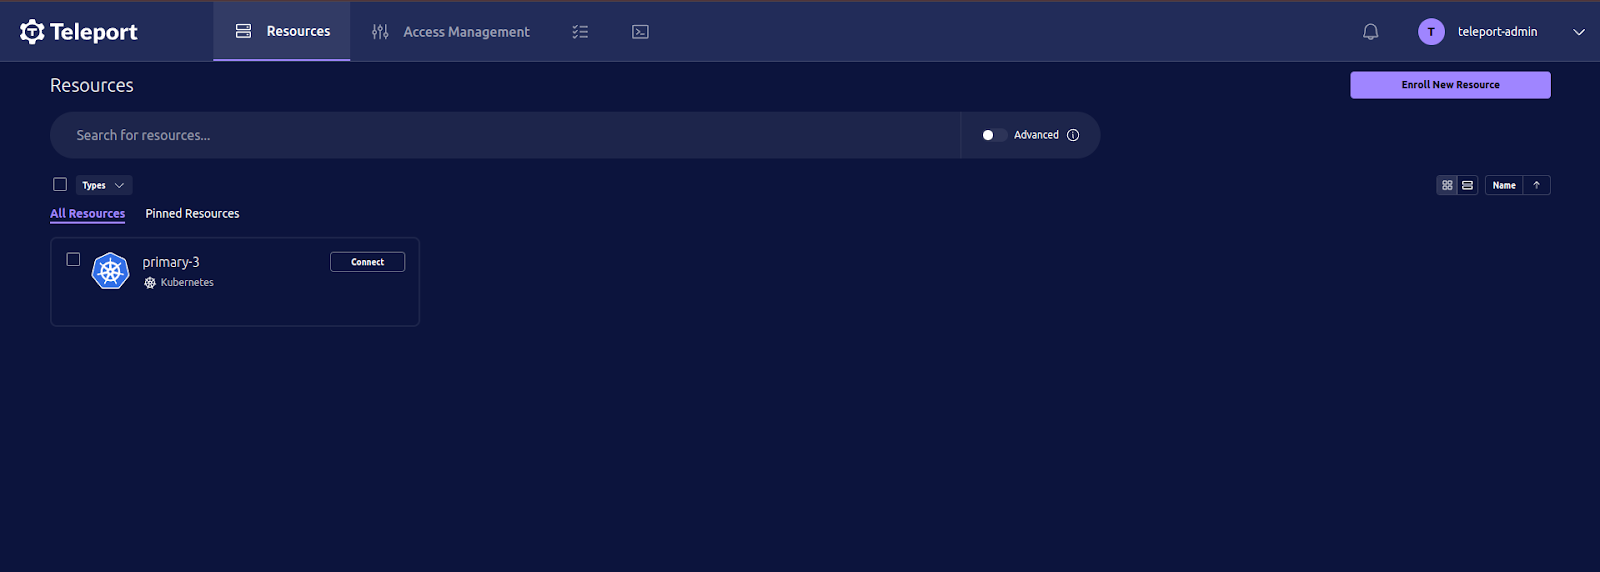
Access the Teleport Web Interface: Navigate to the Teleport web interface.
View Audit Log: Go to the "Audit Log" section to view recorded kubectl sessions.
By following these steps, you can effectively use Teleport to manage access to your Kubernetes clusters, ensuring secure and controlled access with fine-grained RBAC and auditing capabilities.
After deploying Teleport, you can configure it using various methods to suit your needs. Here are some key points to consider:
Configuration Methods
Static Configuration File:
At startup, Teleport reads a configuration file from the local filesystem (default path is /etc/teleport.yaml).
This file controls aspects of the cluster that are not expected to change frequently, such as the ports that services listen on.
Dynamic Resources:
Dynamic resources control aspects of your cluster that are likely to change over time, such as roles, local users, and registered infrastructure resources.
These can be managed using infrastructure as code tools like Terraform, Helm, and the tctl client tool.
Configuration Fields
Service Configuration:
You can enable or disable various Teleport services by including the appropriate configuration in your Teleport configuration file. For example: service_name: enabled: "no"
Supported services include:
-
Application Service (app_service)
-
Auth Service (auth_service)
-
Database Service (db_service)
-
Discovery Service (discovery_service)
-
Kubernetes Service (kubernetes_service)
-
Proxy Service (proxy_service)
-
SSH Service (ssh_service)
-
Desktop Service (windows_desktop_service)
-
Jamf Service (jamf_service).
High Availability Configuration
Storage Configuration: The storage section configures the cluster state backend and session recording backend for the Auth Service.
Example:
version: v3
teleport:
  Storage:
# ...
Consult the Backends Reference for specific fields to set in the storage section.
Auth Service Configuration:
The auth_service section configures the Auth Service.
Example:
version: v3
teleport:
  storage:
    # ...
  auth_service:
    enabled: true
    cluster_name: "mycluster.example.com"
    # Remove this if not using Teleport Enterprise
    license_file: "/var/lib/teleport/license.pem"
  Proxy_service:
enabled: false
This configuration enables the Auth Service and specifies the cluster name and license file if using Teleport Enterprise.
Custom Configuration with Helm
Custom YAML: You can provide custom YAML under proxy.teleportConfig and auth.teleportConfig to override elements of the default Teleport Proxy Service and Auth Service configurations.
Example:
proxy:
  teleportConfig:
    proxy_service:
      public_addr: "mycluster.example.com:443"
auth:
  teleportConfig:
    auth_service:
      enabled: true
cluster_name: "mycluster.example.com"
Any YAML provided under a teleportConfig section will be merged with the chart's default YAML configuration, with your overrides taking precedence.
Additional Considerations
-
Single Sign-On (SSO): For production deployments, it is recommended to set up Single Sign-On with your provider of choice.
-
Kubernetes RBAC: Fine-tune your Kubernetes RBAC to enable fine-grained controls for accessing Kubernetes resources.
By following these guidelines, you can effectively configure your Teleport deployment to meet your specific requirements.
Best Practices
-
Minimize API Server Flags:
Avoid using flags like --insecure-port, --insecure-bind-address, and --anonymous-auth to reduce security risks. -
Follow Least Privilege:
Assign the minimum privileges necessary for users or service accounts to perform their tasks. Use roles instead of cluster roles whenever possible, and avoid using wildcards in permissions. -
Avoid Default Service Accounts:
Create custom service accounts instead of using default ones to ensure better control over permissions.
Conclusion
Teleport provides a scalable solution to manage Kubernetes access, balancing security, usability, and compliance. It addresses the complexity of Kubernetes environments and multi-tenant setups by streamlining key, certificate, and credential management.
Prior to adopting Teleport, organizations encountered significant challenges with native Kubernetes RBAC. The manual management of RBAC across numerous clusters and users proved to be complex and prone to errors. As the number of users and clusters increased, the complexity and administrative overhead associated with RBAC also grew, leading to scalability issues. The default security settings and static credentials were vulnerable to unauthorized access and data breaches. Compliance and audit logging were difficult in multi-tenant environments, making it hard to meet regulations.